🐳 Docker Deployment Mastery

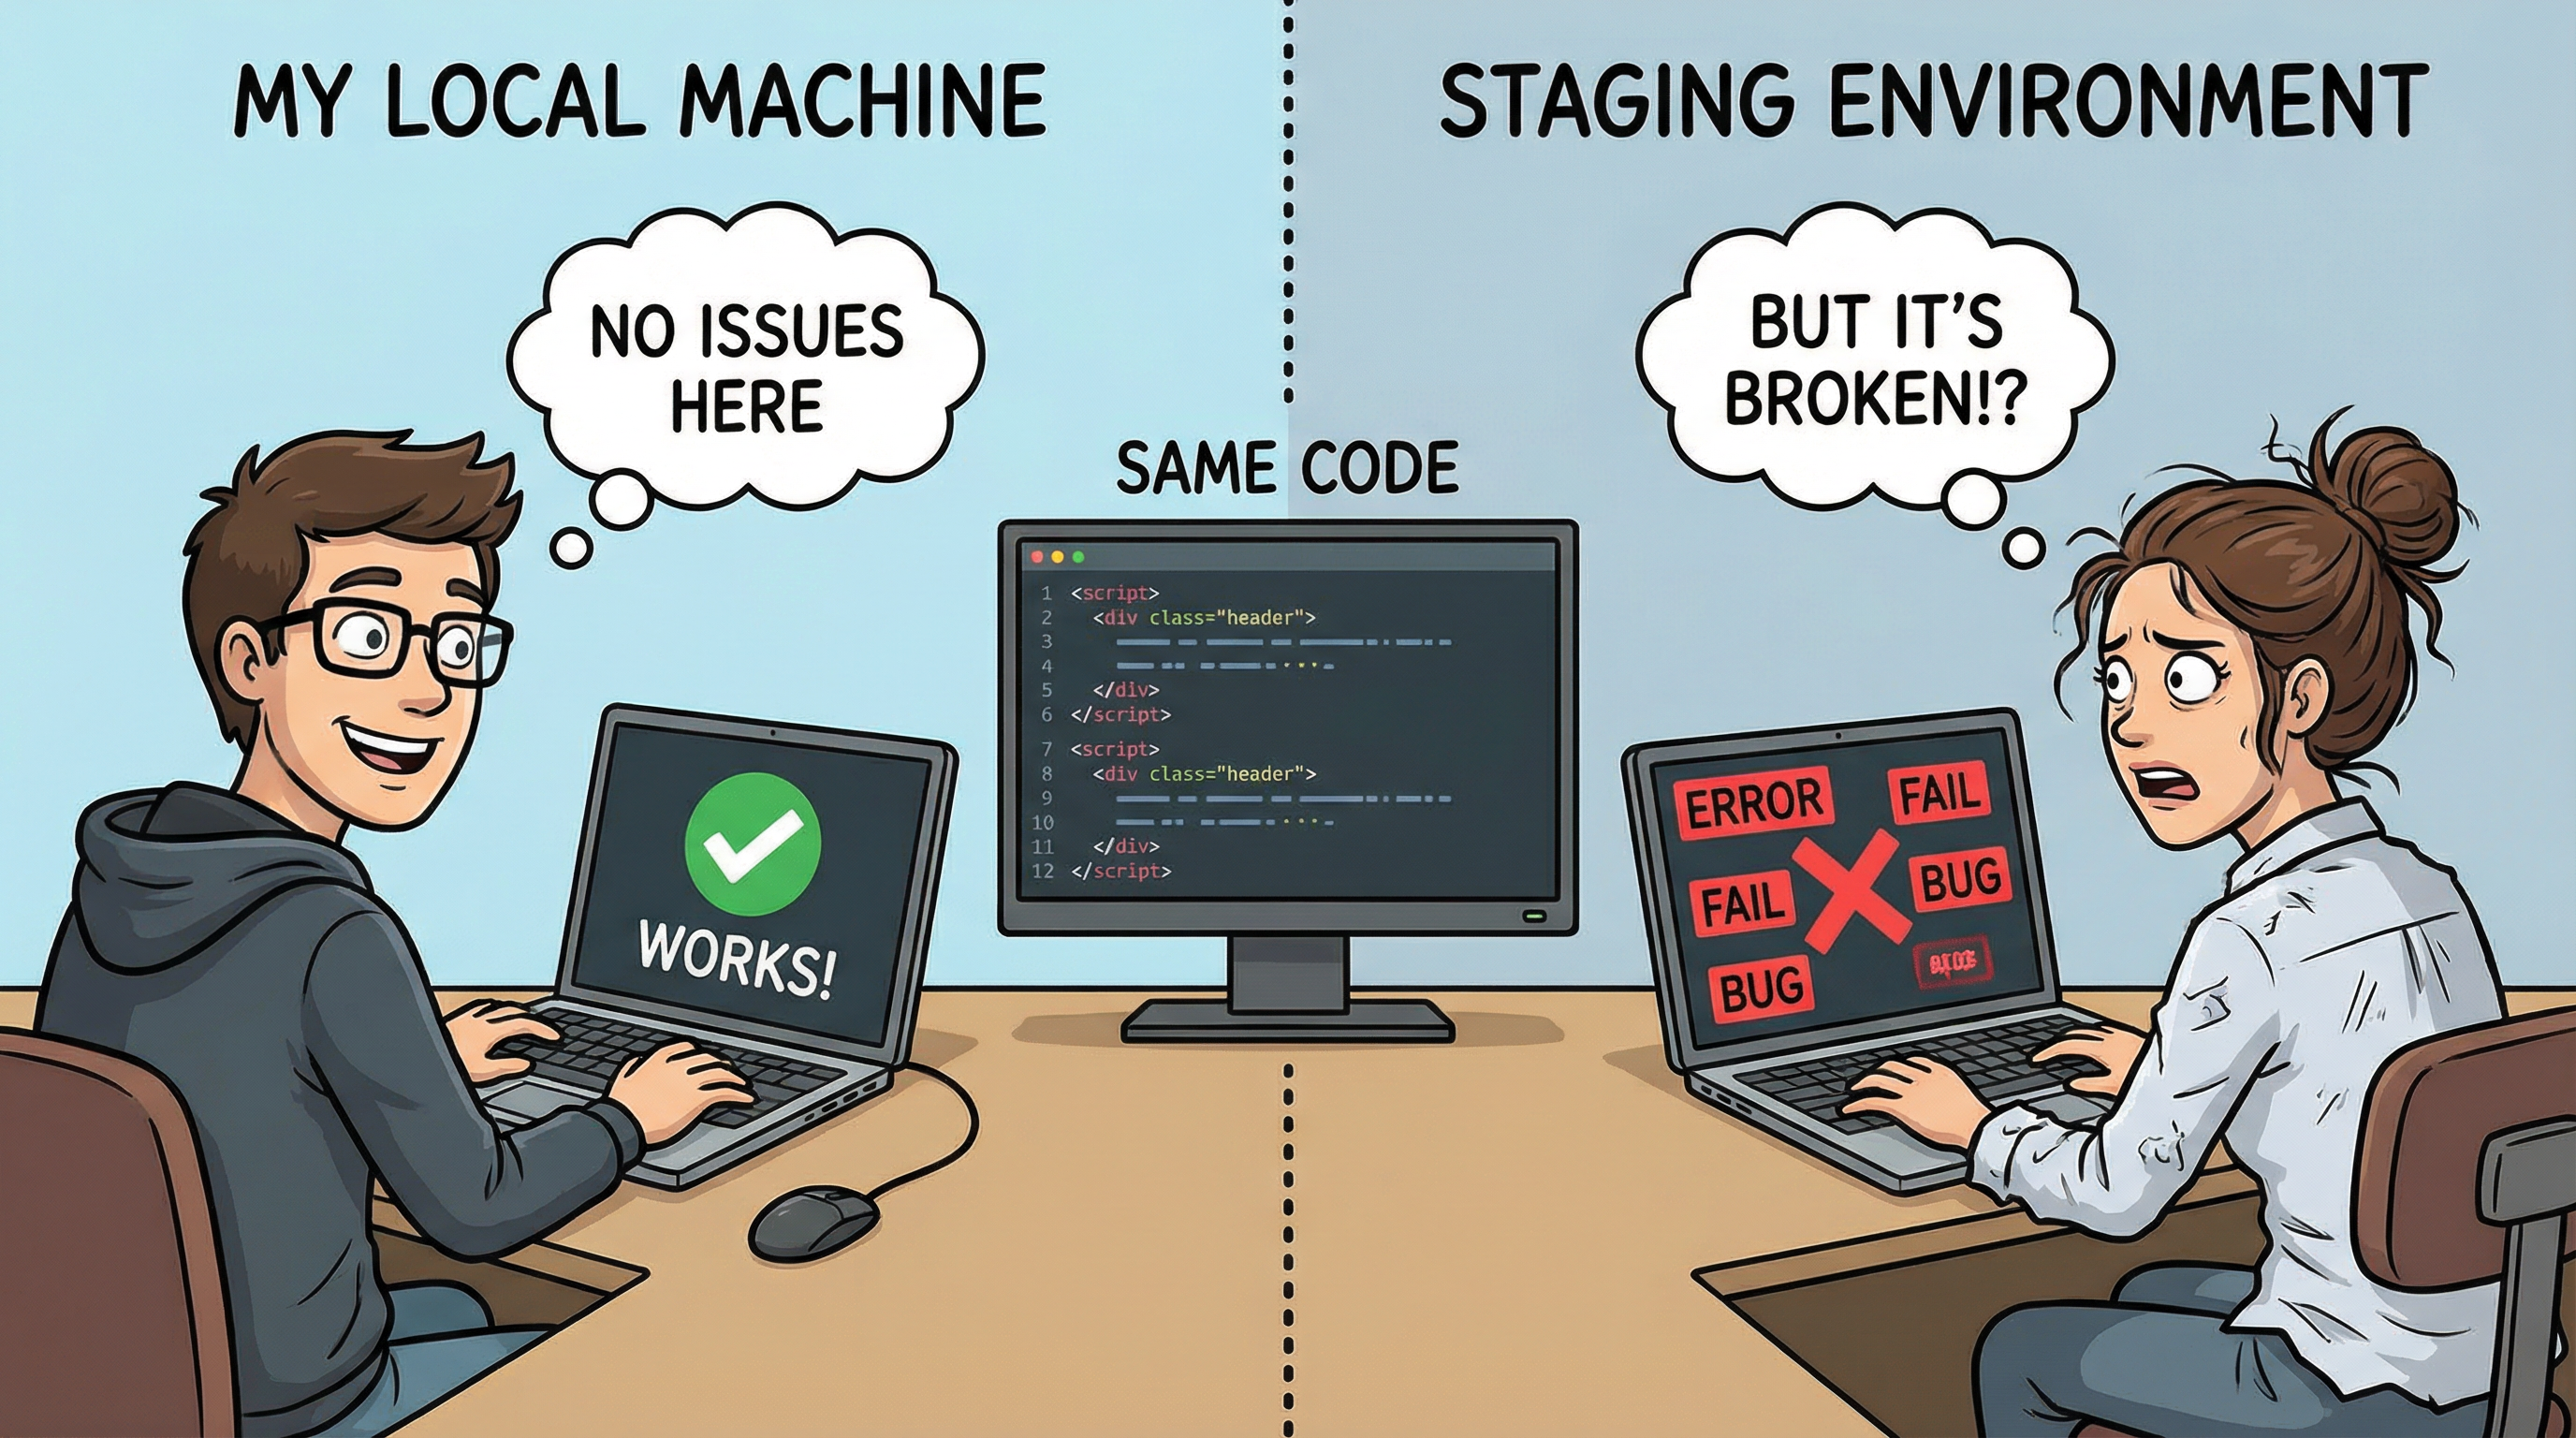
🎯 The "Works on My Machine" Problem

Imagine: you've built a beautiful web app. It works perfectly on your laptop. You send it to a colleague, and suddenly...

Works on my machine problem illustration

🧪 Interactive Experiment: Click Each Machine

See what happens when the same code runs on different systems:

💻 Developer's Laptop

Ubuntu 22.04

Python 3.10

PostgreSQL 14

💻 Colleague's Machine

macOS Ventura

Python 3.9

PostgreSQL 13

💡 Why This Matters (WIIFM)

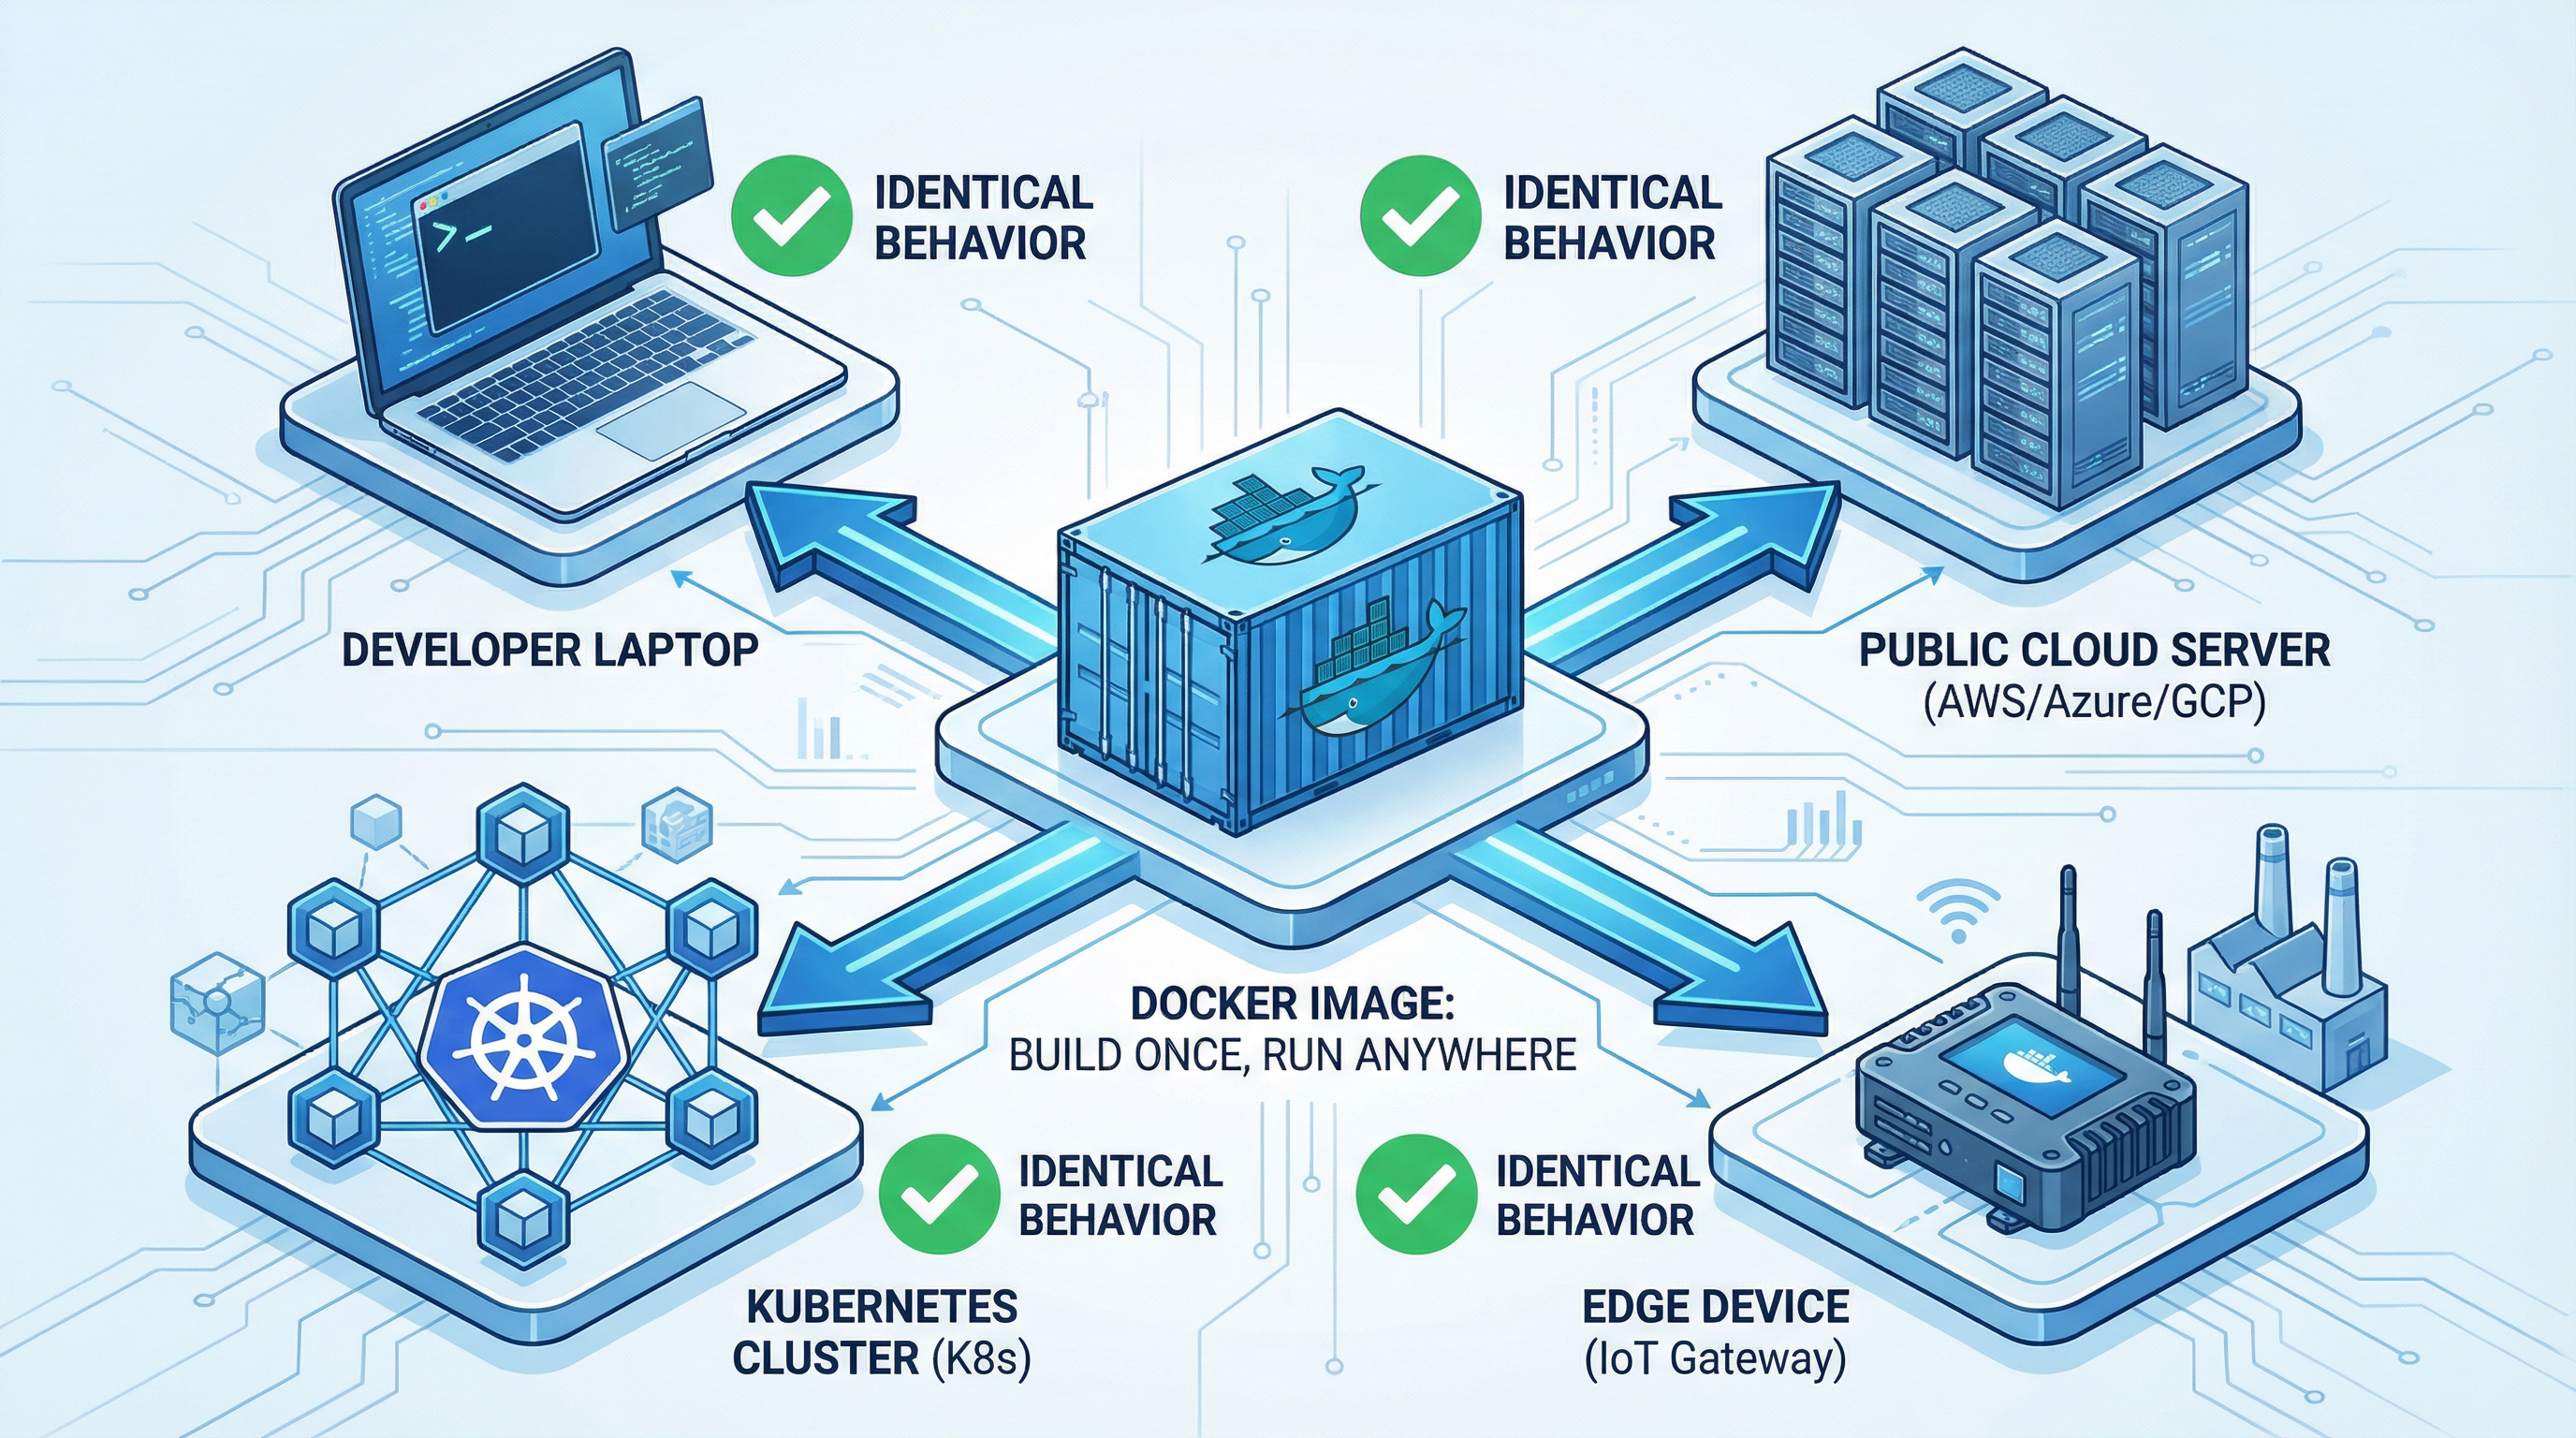
You'll master how Docker eliminates the infamous "works on my machine" problem. You'll package apps with everything they need to run consistently anywhere—from your laptop to production servers. According to Docker's 2024 research, containerization provides consistency, portability, and enhanced security while reducing deployment times by up to 70%.

📋 What's in This Lesson

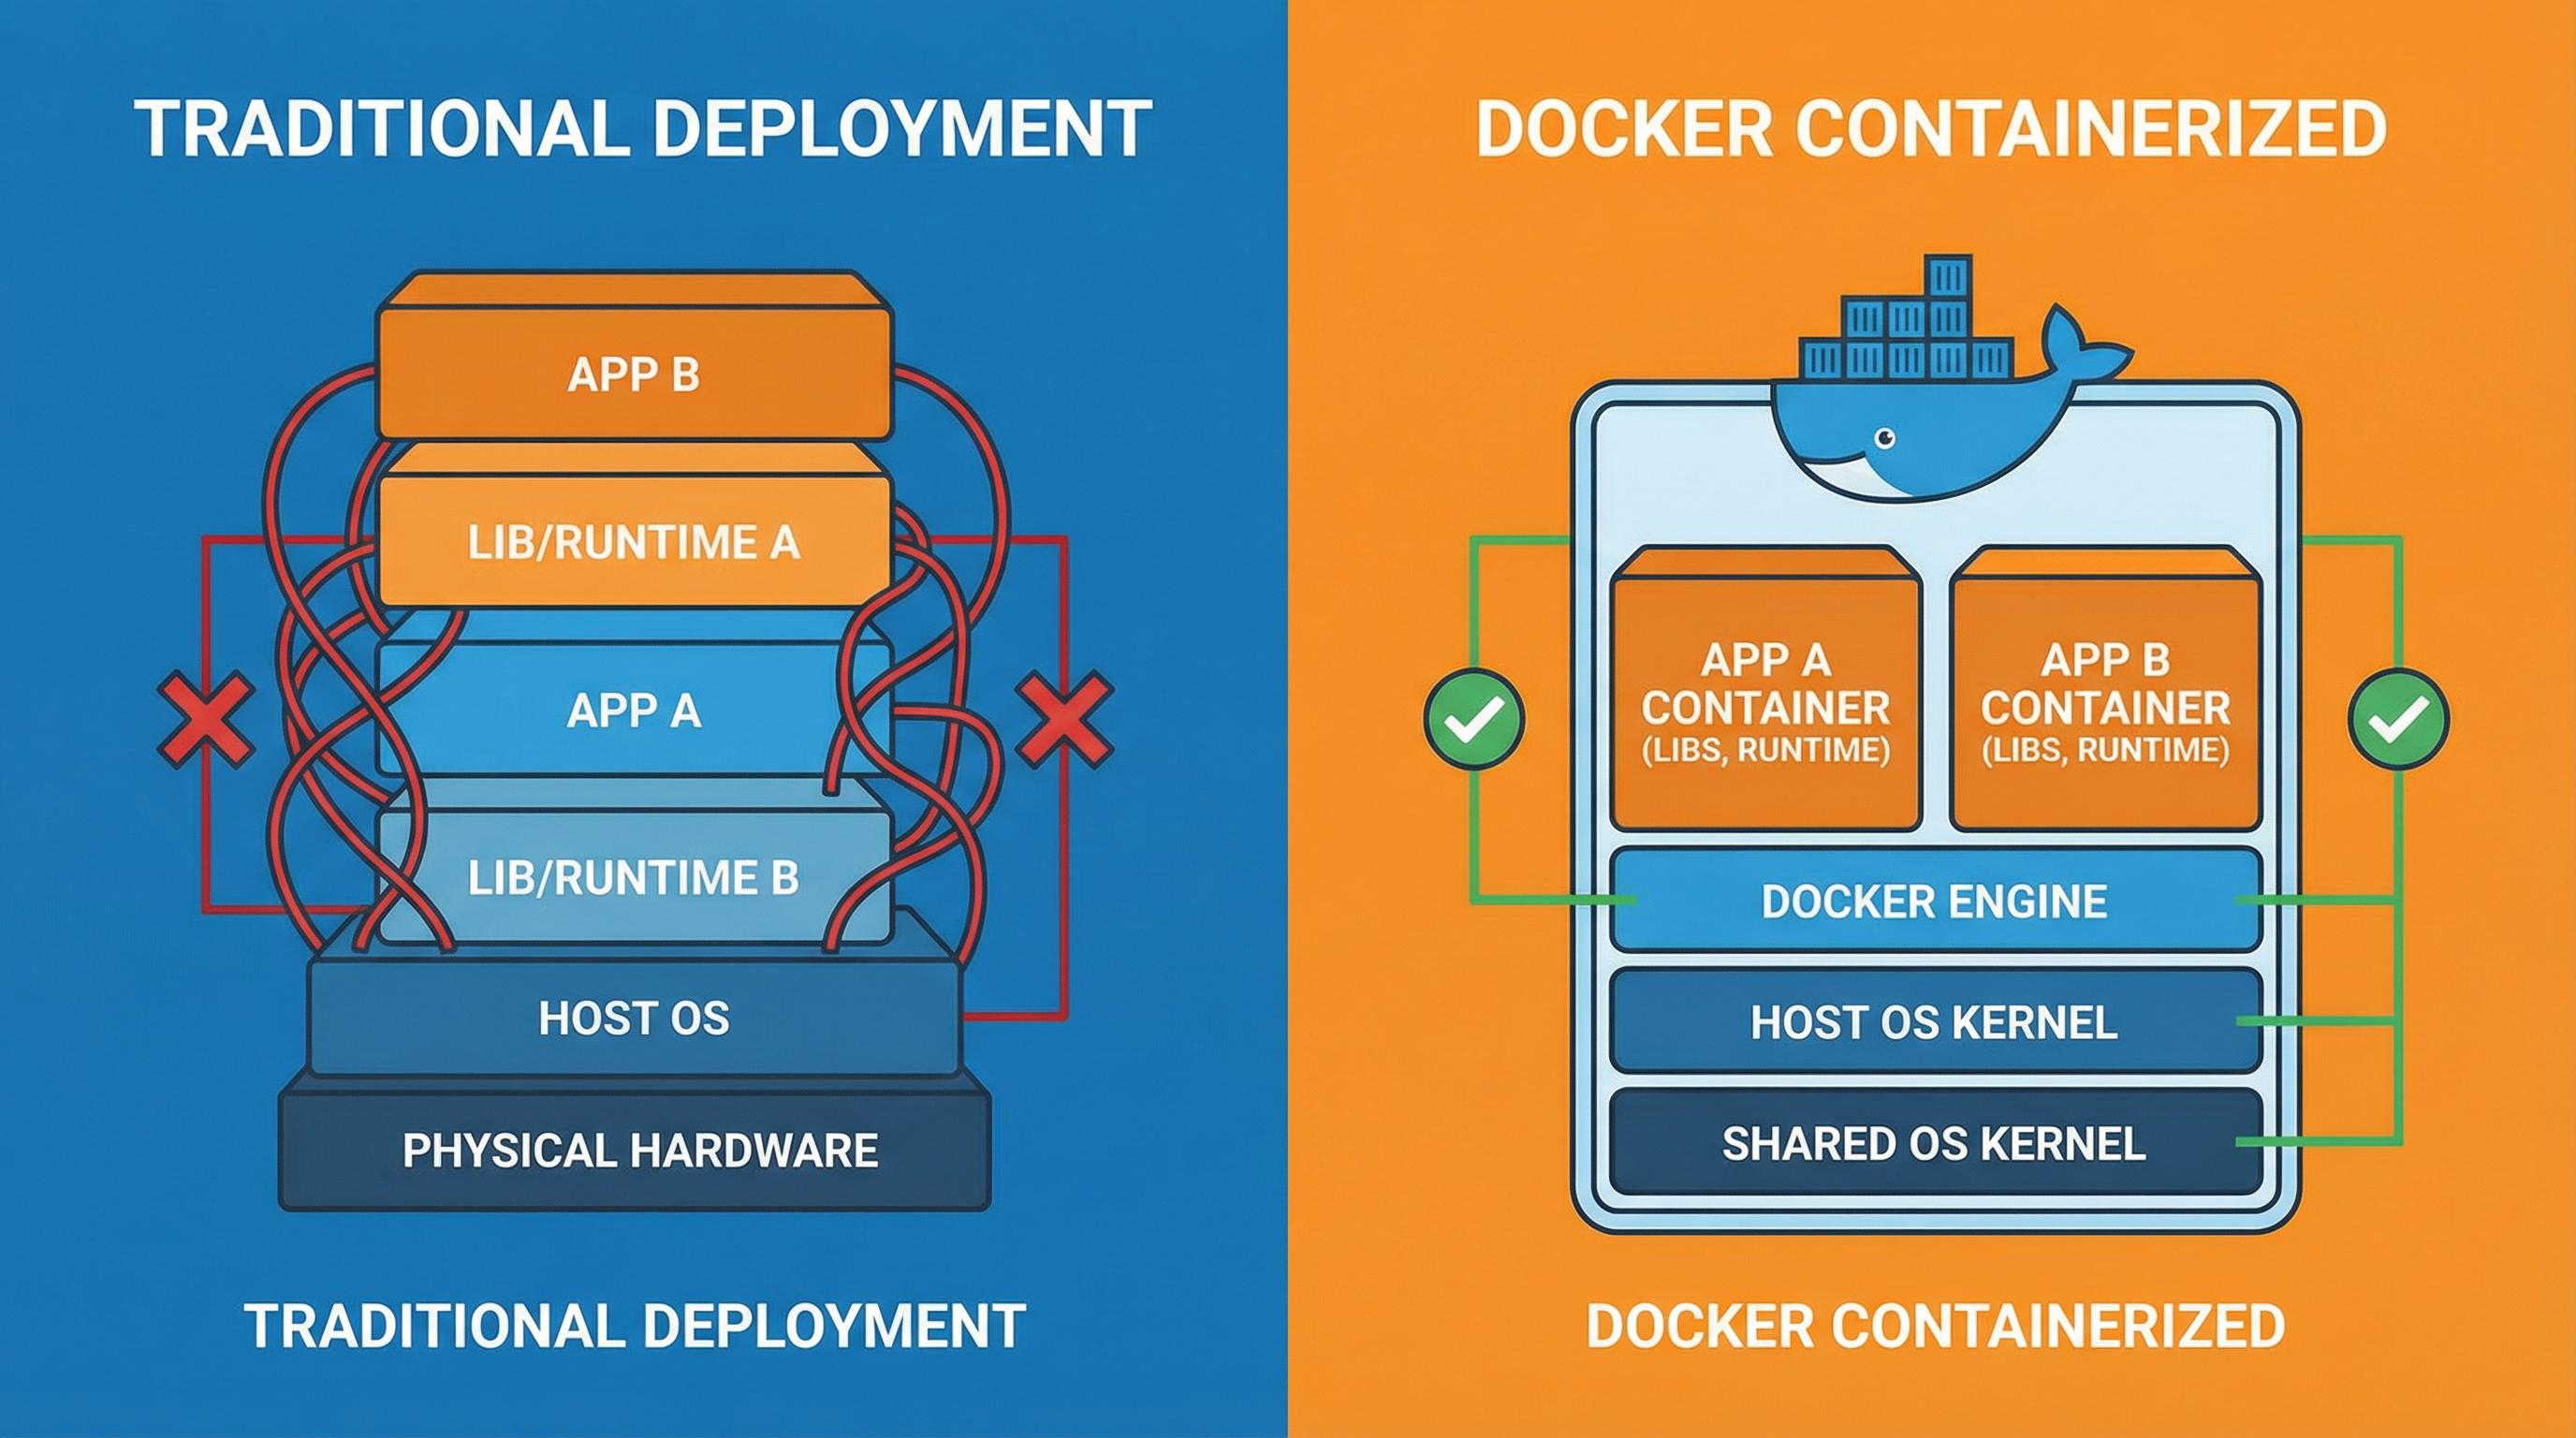
  • Compare traditional vs. containerized deployments
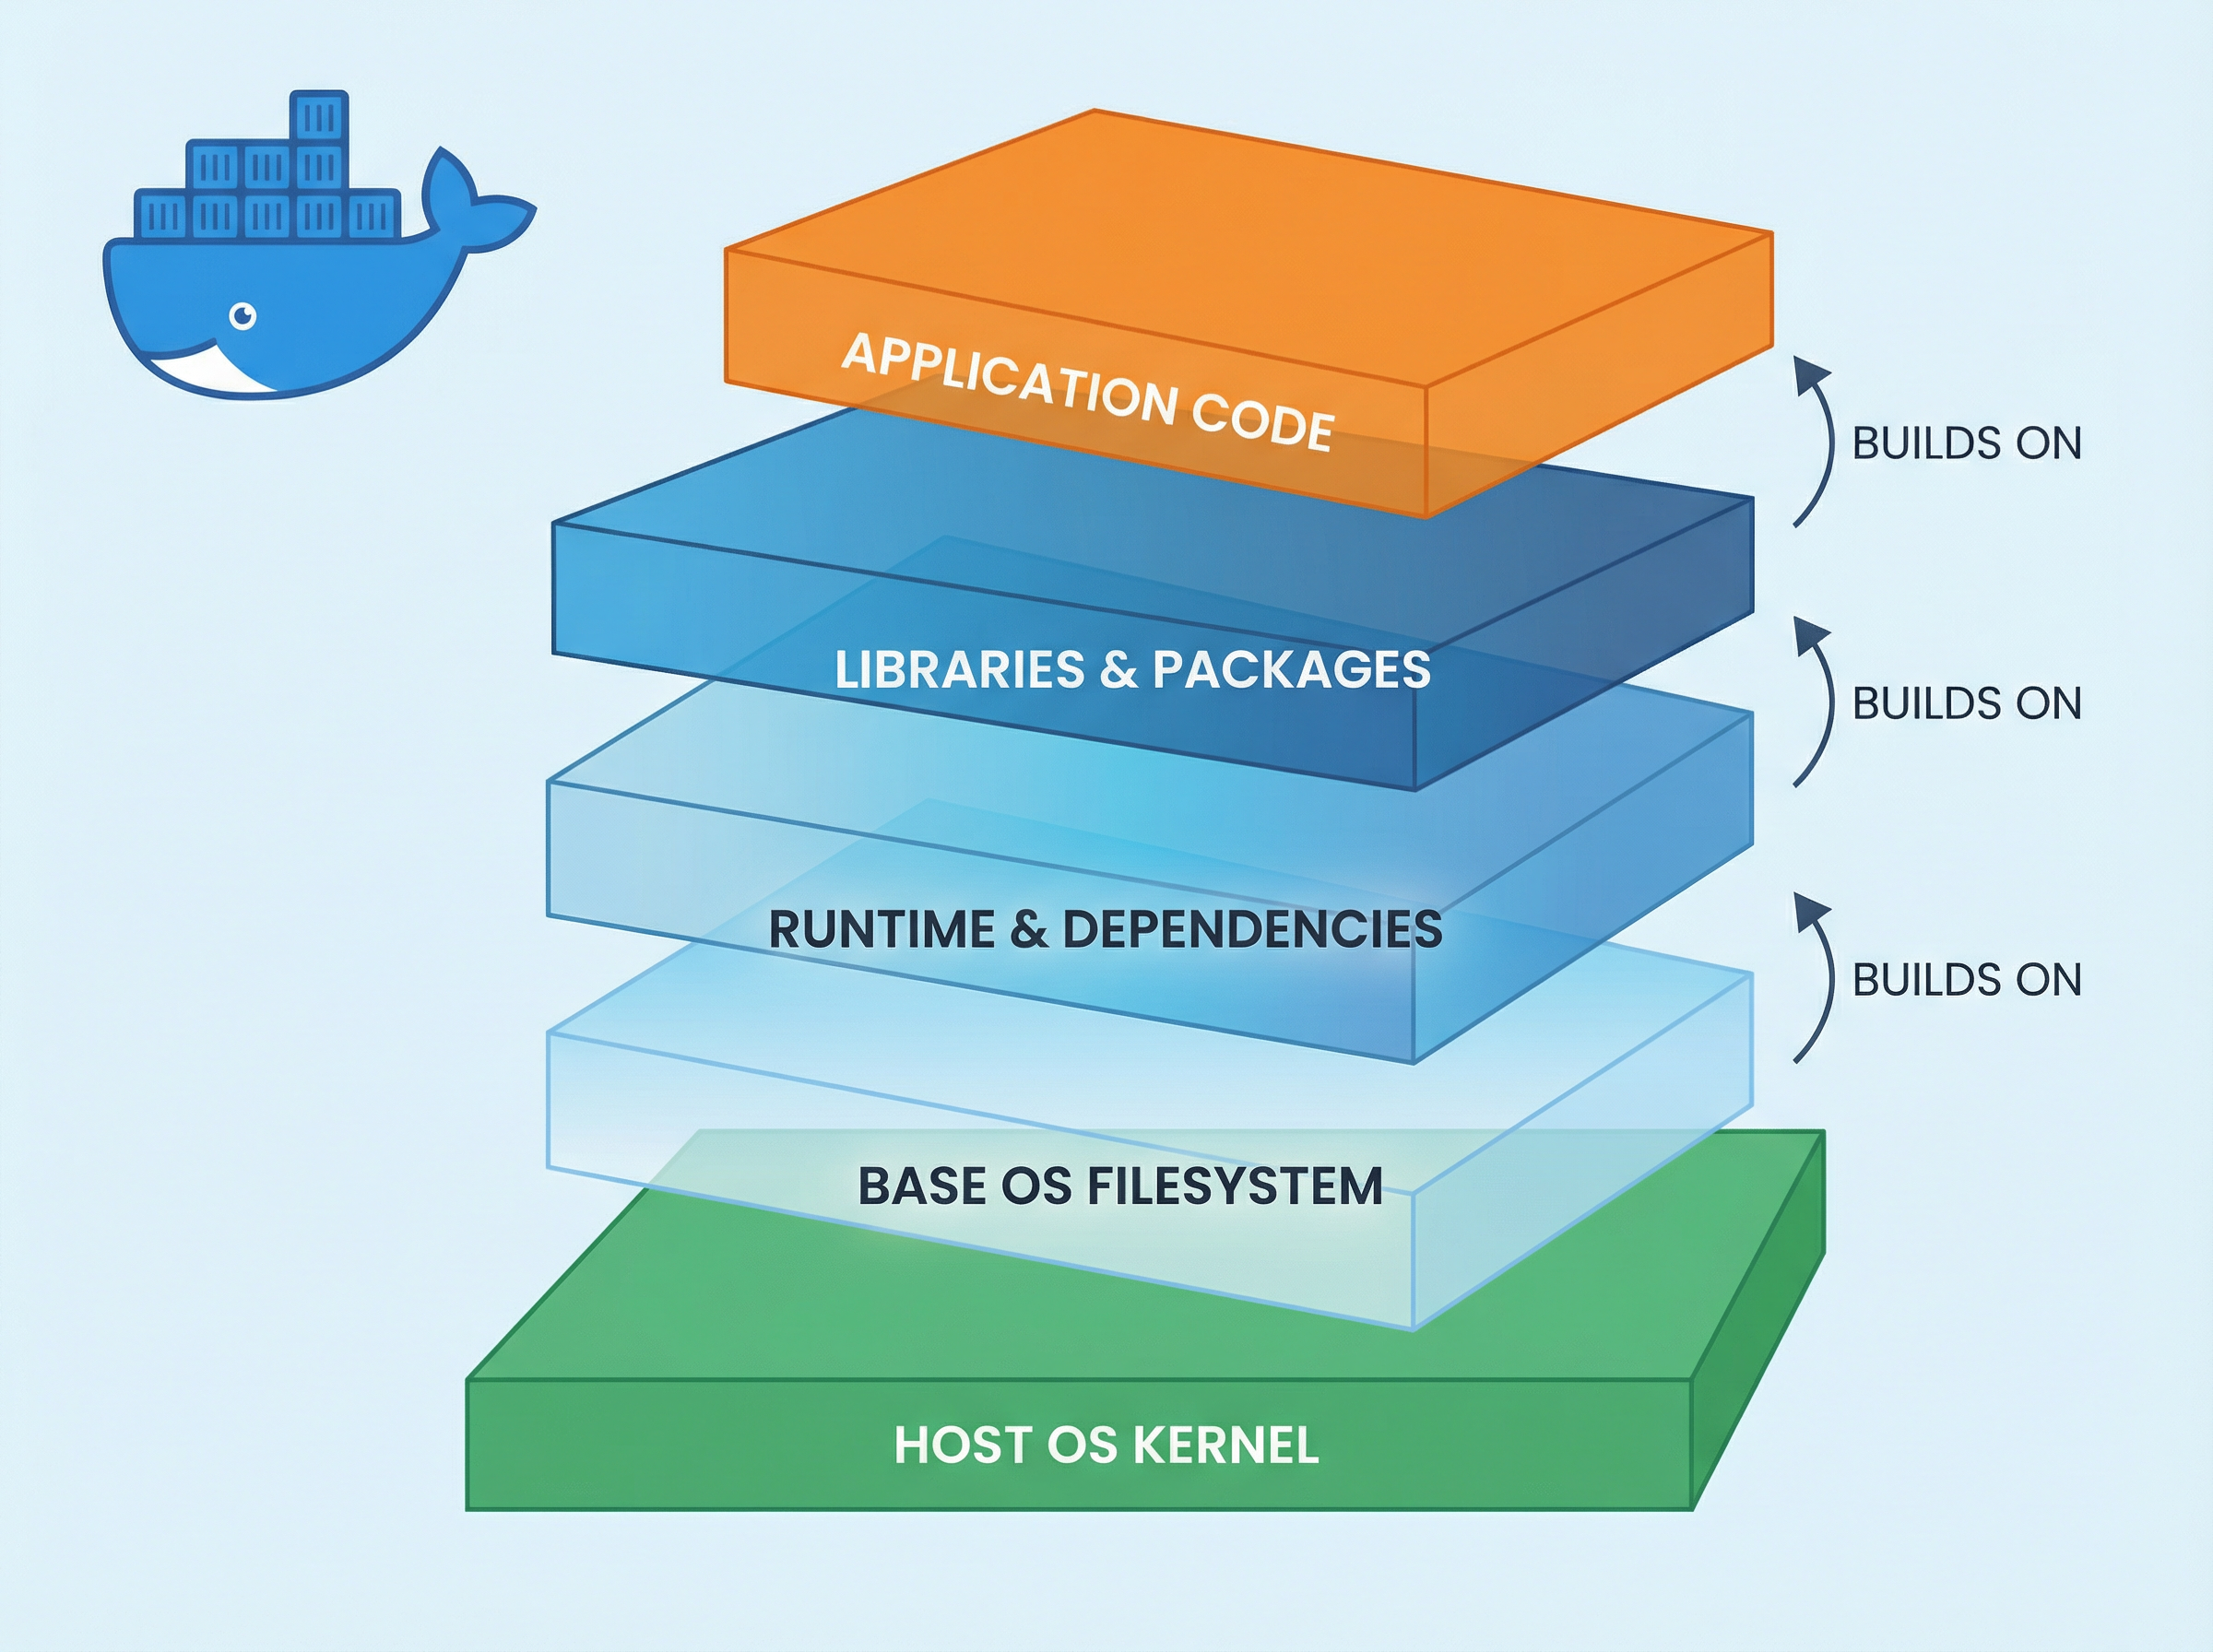
  • Understand Docker's layered architecture (OS, libc, dependencies)
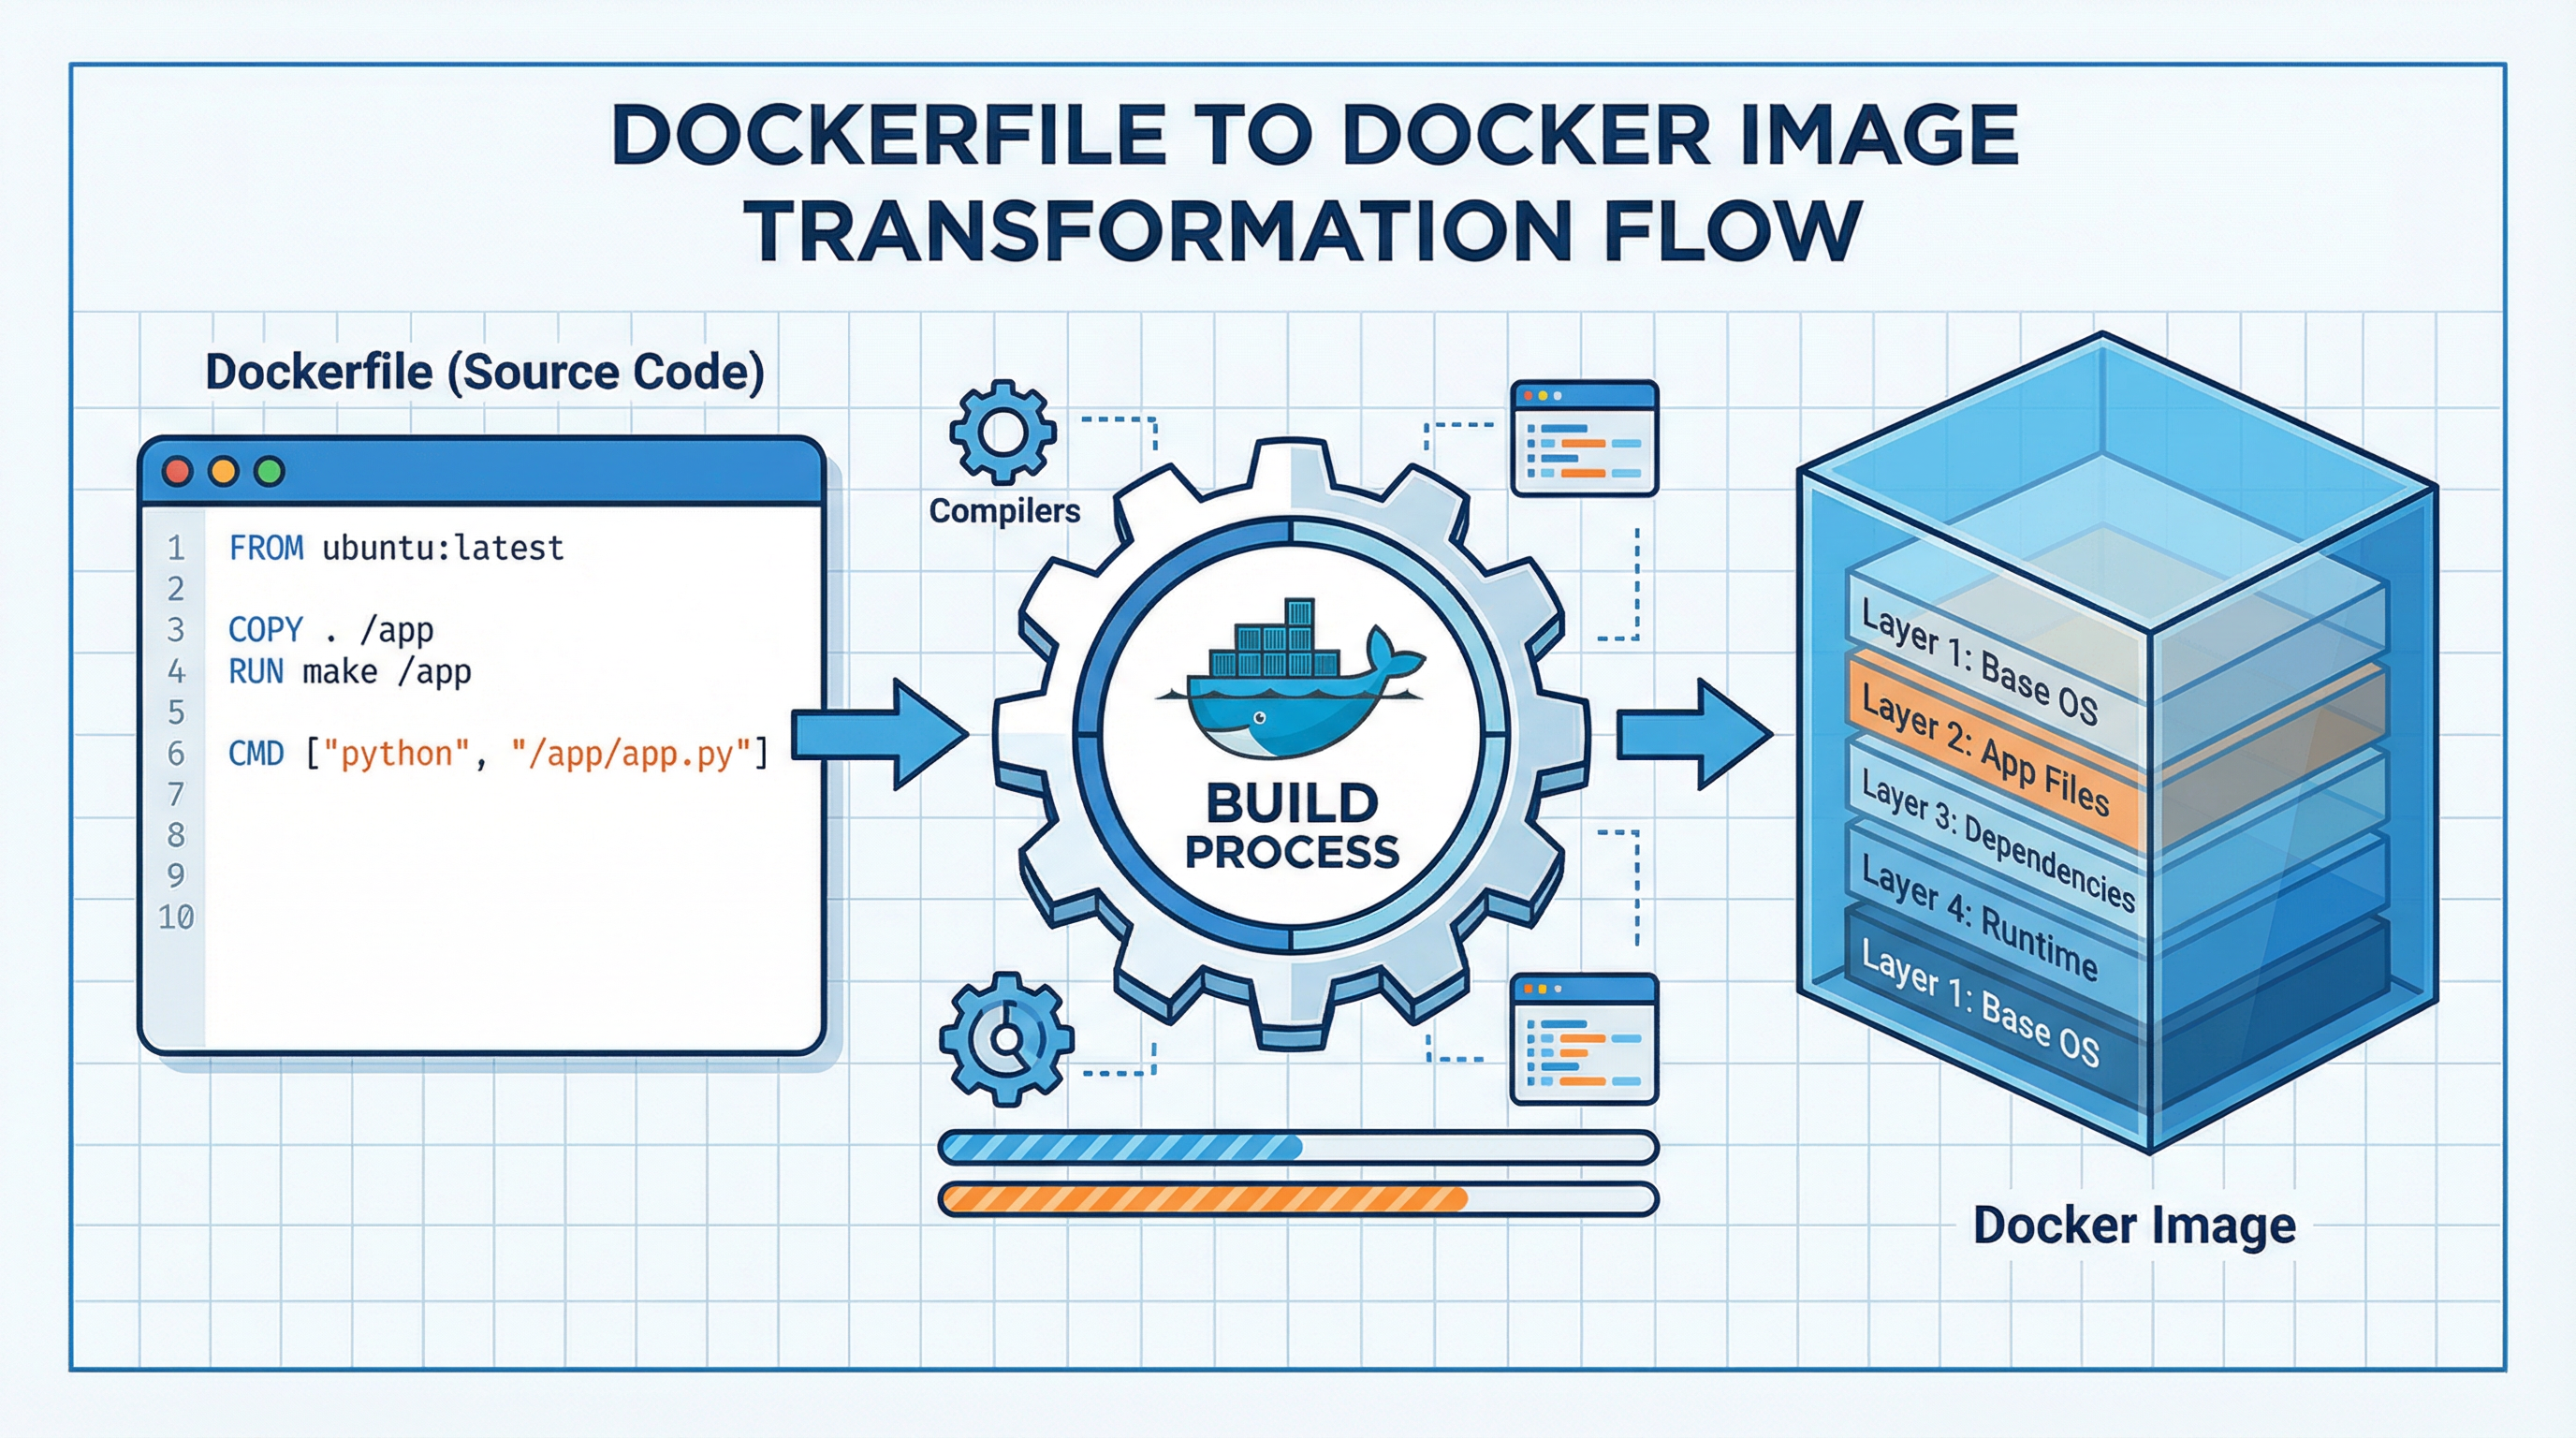
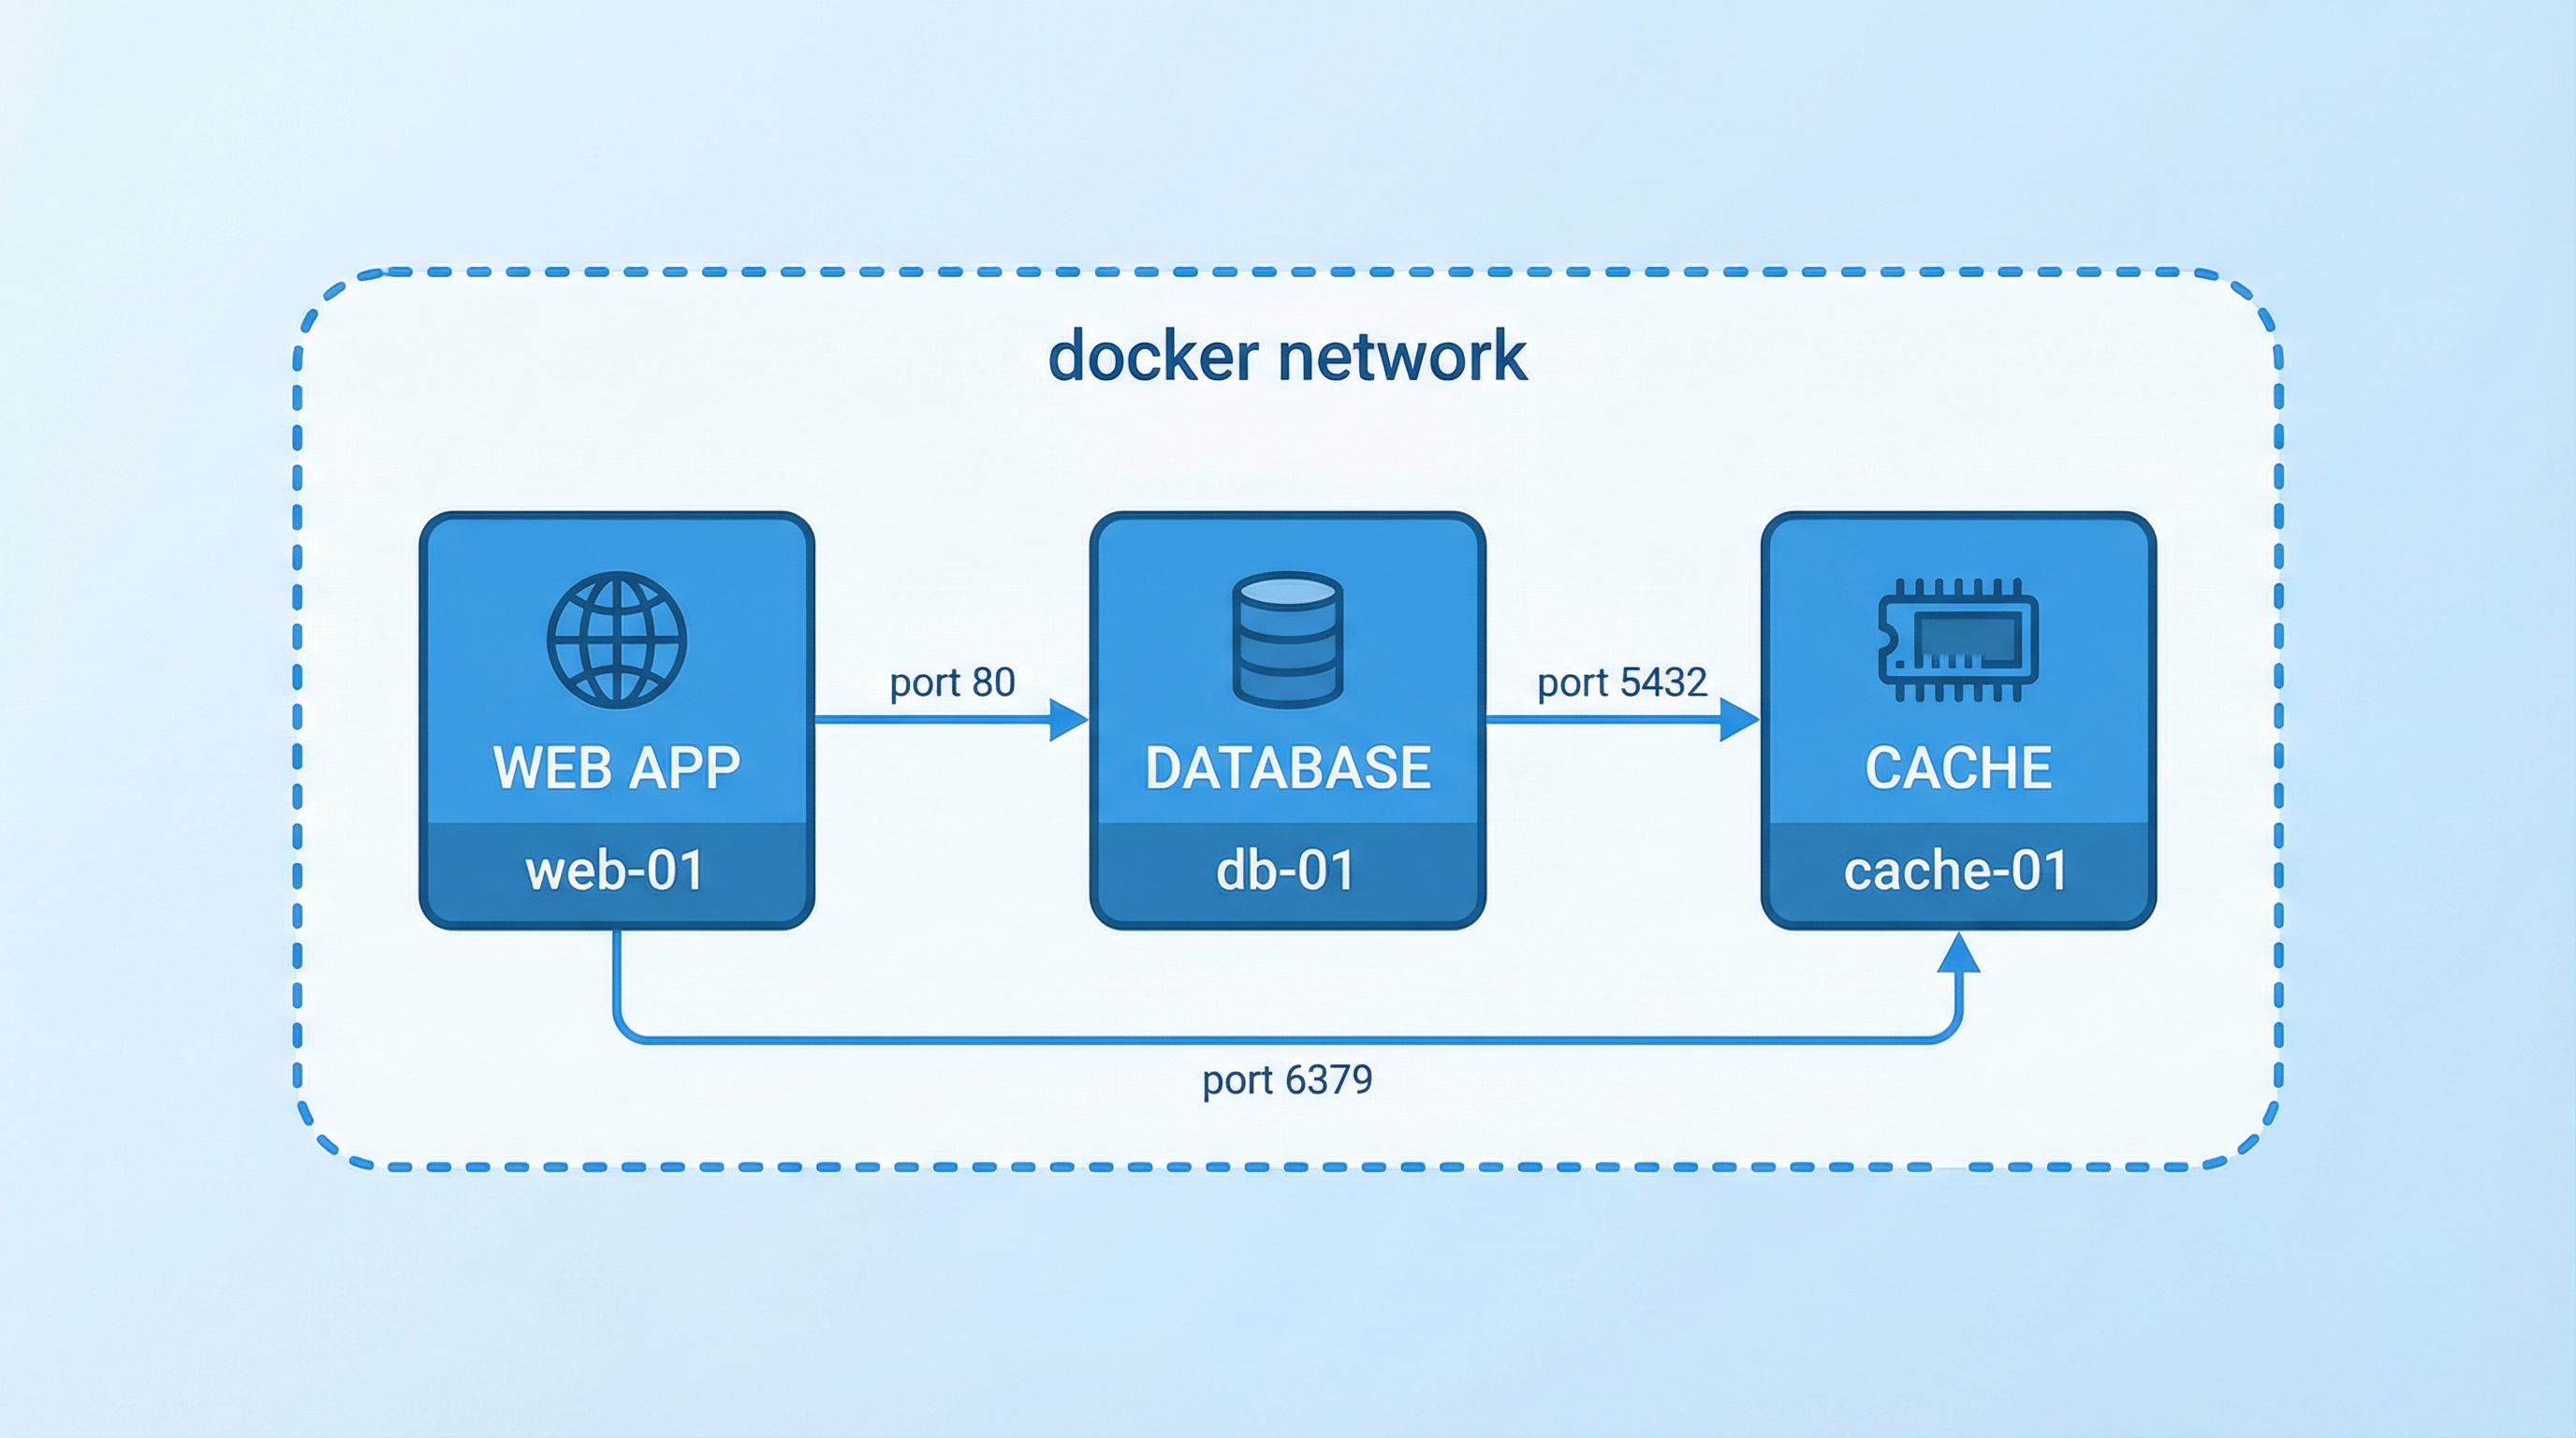
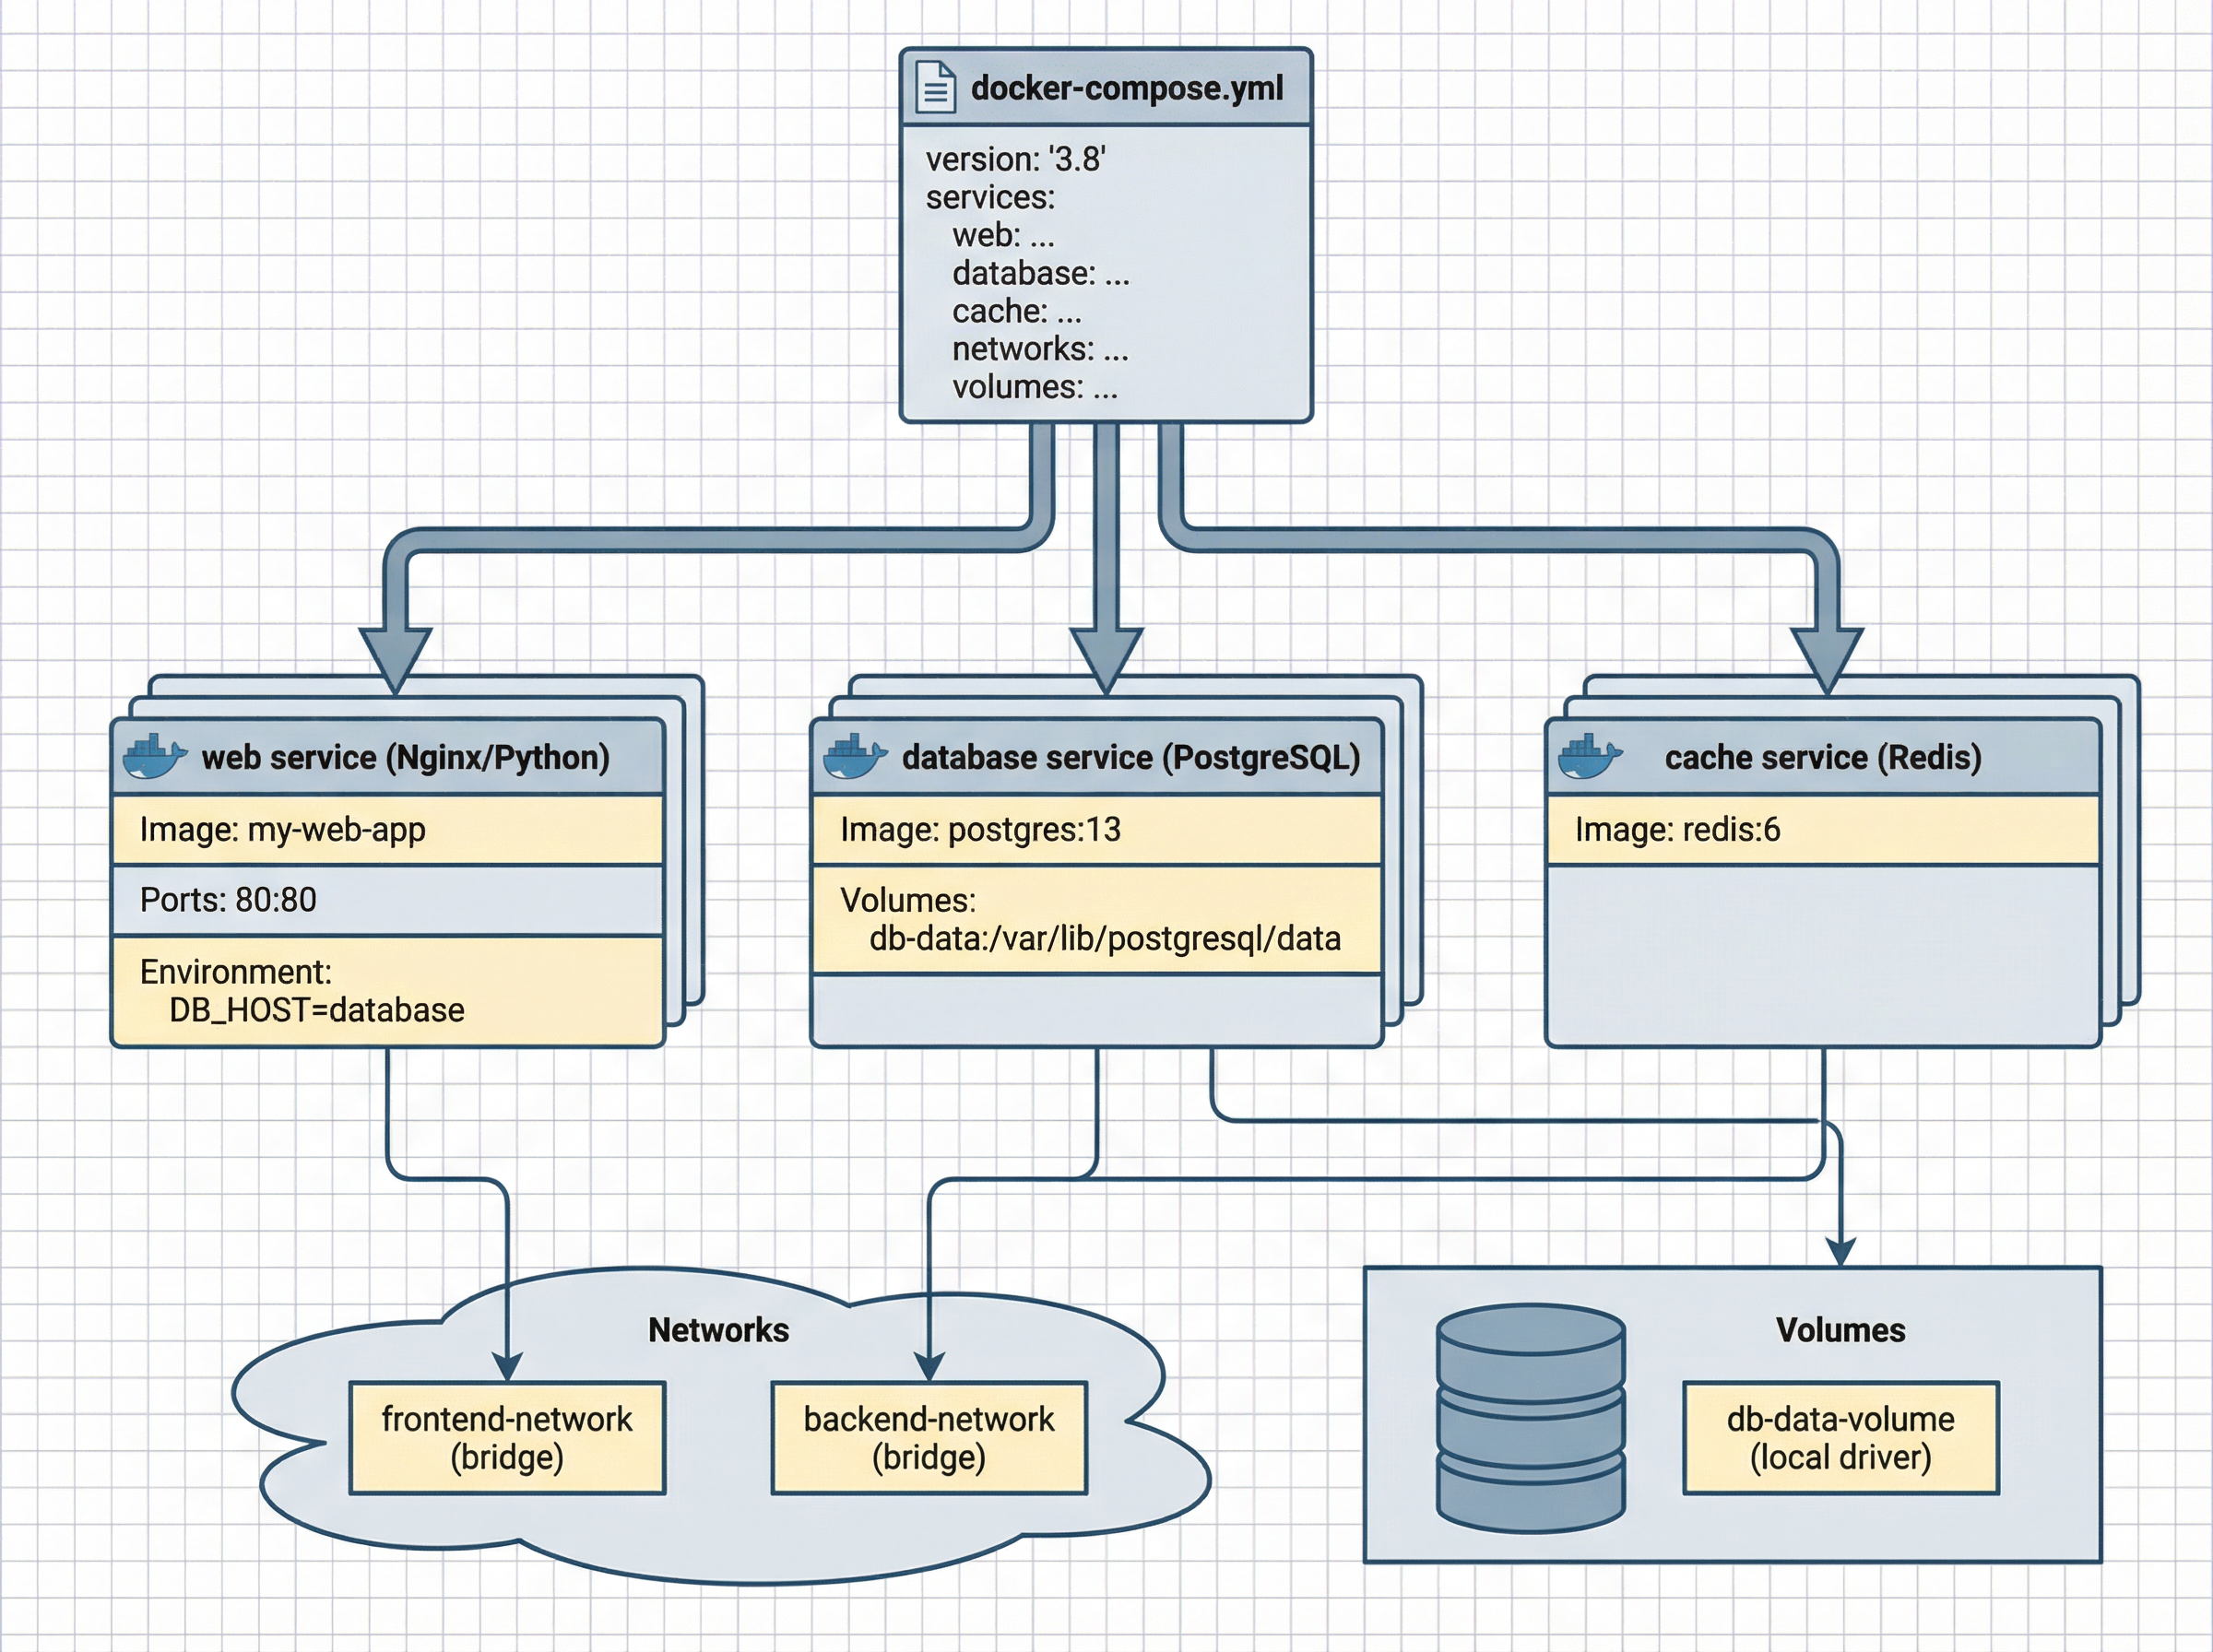
  • Create Docker images and configure networks & volumes
  • Experience "build once, run anywhere" in action
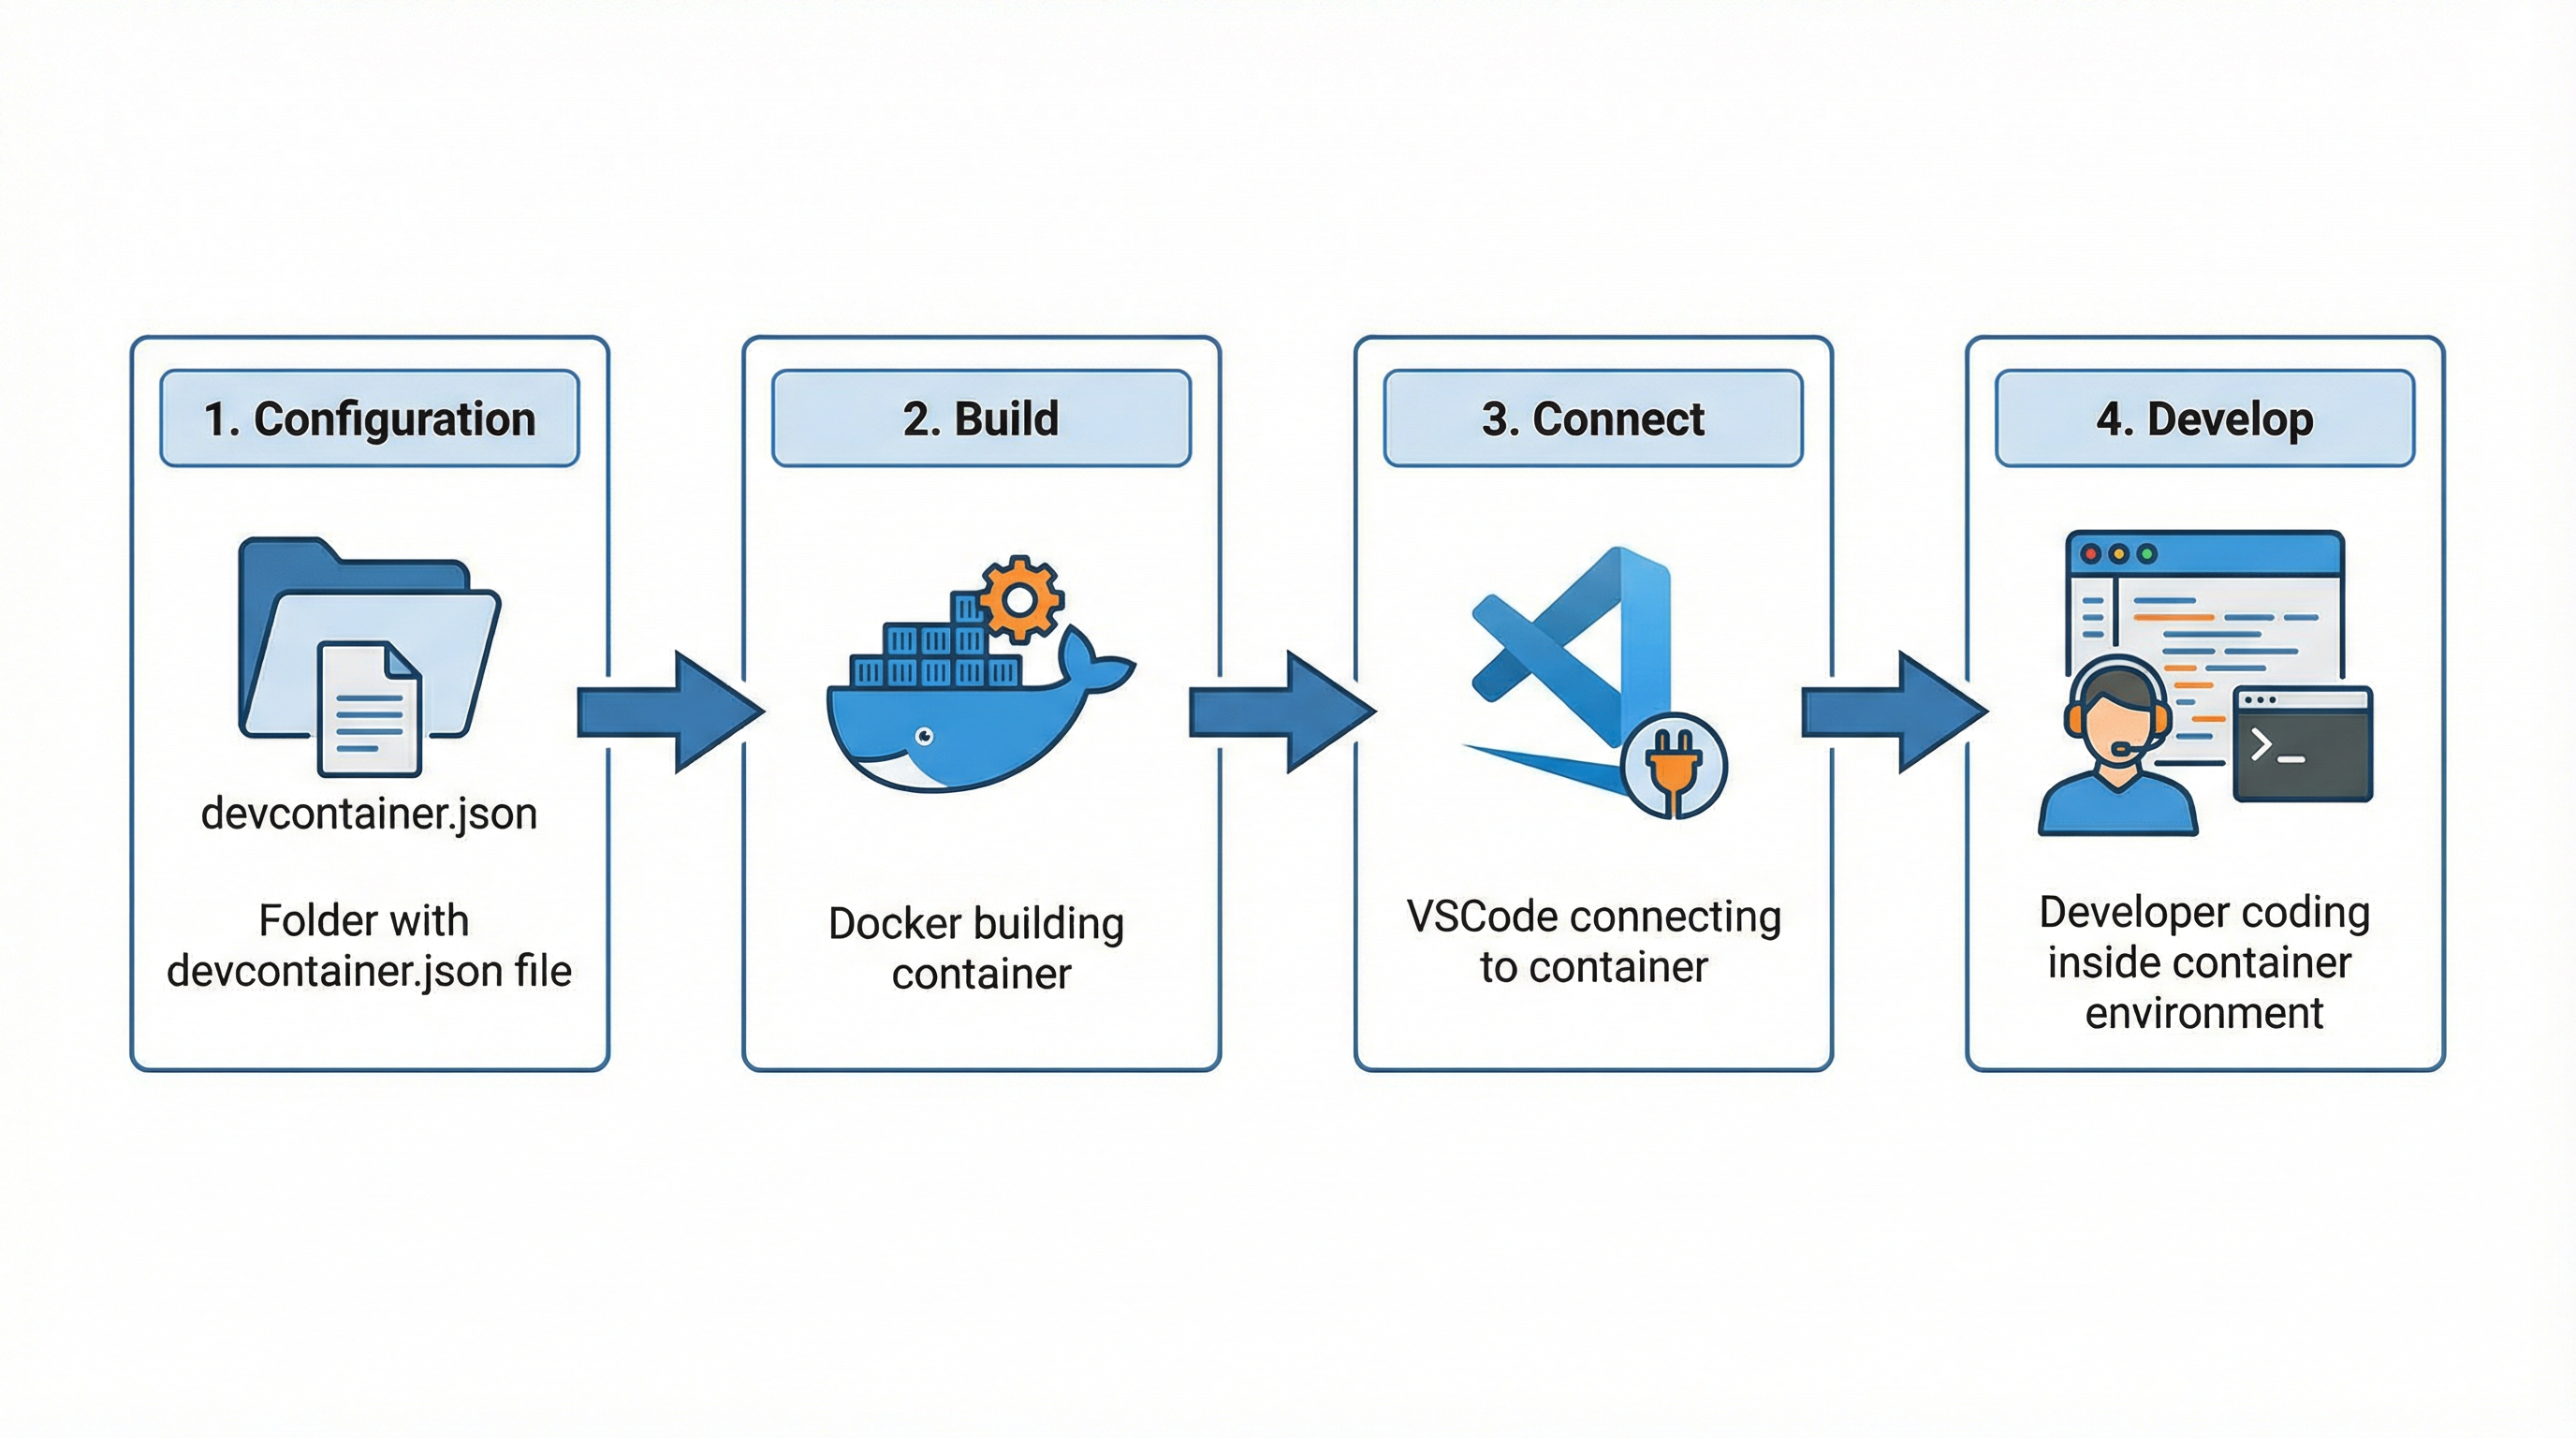
  • Set up VSCode Dev Containers for seamless development

📦 Traditional Deployment: The Old Way

Before containers, deploying applications meant manually configuring every layer on each server. This created a brittle, error-prone process.

Traditional vs Docker deployment comparison
1 Physical/Virtual Server

Expensive to maintain, slow to provision (hours to days), and wasteful—most servers run at only 10-30% capacity.

2 Operating System

Must match your dev environment exactly. Different OS versions = different behaviors. Updates can break your app.

3 System Libraries (libc, OpenSSL)

Manual installation via apt, yum, or brew. Version conflicts are common. Shared across all apps, causing "dependency hell."

4 Runtime Environment

Need specific Python/Node/Java versions. Managing multiple versions requires tools like pyenv, nvm, rbenv—adding complexity.

5 Application Dependencies

Installed globally or in virtual environments. Can conflict with other apps. "It works on my machine" problems emerge here.

6 Your Application Code

Finally! But it's tightly coupled to all layers below. Move to a different server? Start from layer 1 again.

⚠️ The Problems

  • Dependency Hell: Conflicting library versions across applications
  • Environment Drift: Dev, staging, and prod slowly diverge over time
  • Slow Onboarding: New developers spend days setting up environments
  • Scaling Pain: Each new server needs hours of manual configuration
🤔 Knowledge Check: What is the primary challenge with traditional deployments?
Security vulnerabilities in the operating system
Environment inconsistency across development, staging, and production
Applications cannot connect to databases properly
Applications run too slowly on physical servers

🐳 Enter Docker: The Container Revolution

Docker packages your application and all its dependencies into a single, portable unit called a container. It's like a shipping crate for software.

Docker layered architecture visualization
1 Host OS Kernel (Shared)
Containers share the host's Linux kernel, making them lightweight (MBs vs. GBs for VMs). Uses namespaces and cgroups for isolation.
2 Base OS Layer (Image)
Minimal filesystem with essential tools and libraries (including libc). Alpine Linux is only ~5MB! Read-only and shared across containers.
3 Runtime Layer
Your specific runtime version, frozen in time. Never worry about updates breaking your app. Each container can use different versions.
4 Dependencies Layer
Exact versions from package.json, requirements.txt, etc. Installed once during build, then immutable.
5 Application Layer
Your code, config, and static assets. All bundled with everything it needs.
6 Container Runtime Layer
Writable, ephemeral changes (logs, temp files). Discarded when container stops unless you use volumes.

✨ The Magic

Layers 2-5 are baked into an image—an immutable blueprint. Build it once, and it runs identically on any machine with Docker. No more "works on my machine"!

🤔 Knowledge Check: What makes Docker containers lightweight compared to virtual machines?
Containers compress application code more efficiently
Containers don't include system libraries like libc
Containers share the host OS kernel instead of bundling a full OS
Containers use less RAM than virtual machines

🏗️ Creating Docker Images: The Dockerfile

A Dockerfile is a recipe that tells Docker how to build your image. Each instruction creates a new layer in the image.

Dockerfile to image transformation

📄 Example: Node.js App Dockerfile

# Layer 1: Start with Node.js 18 on Alpine Linux
FROM node:18-alpine

# Layer 2: Set working directory
WORKDIR /app

# Layer 3: Copy dependency manifests FIRST
COPY package*.json ./

# Layer 4: Install dependencies
RUN npm ci --only=production

# Layer 5: Copy application code LAST
COPY . .

# Metadata: which port to expose
EXPOSE 3000

# Define startup command
CMD ["node", "server.js"]
🔍 Click to understand layer optimization

Why copy package.json before the rest?

Docker caches each layer. If your code changes but dependencies don't, Docker reuses the cached dependency layer—making rebuilds lightning fast (seconds instead of minutes)!

Order matters: Put rarely-changing instructions first, frequently-changing ones last.

🛠️ Build Your Image

docker build -t myapp:1.0 .
  • -t myapp:1.0 = Tag the image with name:version
  • . = Build context (current directory)

🌐 Docker Networks & 💾 Volumes

Containers are isolated by default. Networks let them communicate; volumes let them persist data.

🌐 Networks: Container Communication

Docker networking diagram

Scenario: Your web app needs to talk to a database.

# Create a custom network
docker network create myapp-network

# Run database on the network
docker run -d --name db \
  --network myapp-network \
  postgres:14

# Run app on the same network
docker run -d --name web \
  --network myapp-network \
  -p 3000:3000 \
  myapp:1.0

Now web connects to db using hostname "db"—Docker handles DNS automatically!

💾 Volumes: Data Persistence

Docker volumes persistence

Containers are ephemeral—when stopped, changes are lost. Volumes solve this:

# Create a named volume
docker volume create db-data

# Mount it to the container
docker run -d --name db \
  --network myapp-network \
  -v db-data:/var/lib/postgresql/data \
  postgres:14

Database data now survives restarts, updates, and even container deletion!

🤔 Knowledge Check: Why do we copy package.json before the rest of the code in a Dockerfile?
To prevent package.json from being modified during the build
To reduce the final image size significantly
To leverage Docker's layer caching and speed up rebuilds when only code changes
To ensure dependencies install before code validation

🚀 Build Once, Run Anywhere: The Magic

Now comes the real power. The same image runs identically across different environments—this is Docker's killer feature.

Build once run anywhere concept

🎬 Interactive Command Builder

Check options to build your run command:

docker run myapp:1.0

💻 Developer Laptop

docker run -p 3000:3000 myapp:1.0

✅ Runs perfectly

☁️ Cloud Server

docker run -p 80:3000 myapp:1.0

✅ Runs perfectly

Click a target to see why the same image works in both environments.

🎯 The Payoff

Same image, different environments, identical behavior. You've eliminated environment-specific bugs and configuration drift. Deploy with confidence!

🤔 Knowledge Check: What is the primary benefit of Docker volumes?
They reduce the image size significantly
They persist data beyond the container lifecycle
They speed up container startup times
They enable containers to communicate with each other

🎼 Docker Compose: Multi-Container Orchestration

Real applications need multiple services (web, database, cache). Docker Compose defines them all in one YAML file.

Docker Compose orchestration

📄 docker-compose.yml Example

version: '3.8'

services:
  web:
    build: .
    ports:
      - "3000:3000"
    environment:
      - NODE_ENV=production
      - DB_HOST=db
    depends_on:
      - db
    networks:
      - app-network
    volumes:
      - ./logs:/app/logs

  db:
    image: postgres:14
    environment:
      - POSTGRES_PASSWORD=secret
    volumes:
      - db-data:/var/lib/postgresql/data
    networks:
      - app-network

volumes:
  db-data:

networks:
  app-network:

🚀 One Command to Rule Them All

# Start all services
docker-compose up -d

# View logs
docker-compose logs -f

# Stop everything
docker-compose down

Compose automatically creates networks, volumes, and manages dependencies. Your entire stack is now portable!

🔧 VSCode Dev Containers: Development Nirvana

Now let's take it to the next level. What if your entire development environment lived inside a container?

VSCode Dev Container concept

✨ The Vision

Open a project in VSCode and instantly get:

  • ✅ Correct language runtime (no version conflicts)
  • ✅ All dependencies pre-installed
  • ✅ VSCode extensions configured automatically
  • ✅ Terminal, debugger, IntelliSense—all working perfectly

No manual setup. Ever.

🎯 Perfect For

👥 New Team Members

Clone repo, open in VSCode, start coding. Onboarding in minutes, not days.

🎓 Students & Teachers

Everyone has identical environments. No setup issues in class.

🔄 Multiple Projects

Different Node/Python versions per project. No conflicts.

🔒 Isolation

Keep your host machine clean. Experiment safely.

🛠️ Setting Up Dev Containers

Dev Containers transform your development workflow. Here's how to set them up in four simple steps.

Dev Container workflow steps
1 Install Prerequisites
• Docker Desktop (Mac/Windows) or Docker Engine (Linux)
• VSCode with "Dev Containers" extension by Microsoft
2 Create .devcontainer folder
In your project root: .devcontainer/devcontainer.json
3 Configure devcontainer.json
Define your container, extensions, and settings
4 Reopen in Container
VSCode → Command Palette → "Reopen in Container"

📄 Example: devcontainer.json

{
  "name": "Node.js Dev Container",
  "image": "mcr.microsoft.com/devcontainers/javascript-node:18",
  
  "customizations": {
    "vscode": {
      "extensions": [
        "dbaeumer.vscode-eslint",
        "esbenp.prettier-vscode",
        "ms-azuretools.vscode-docker"
      ],
      "settings": {
        "terminal.integrated.defaultProfile.linux": "bash"
      }
    }
  },
  
  "forwardPorts": [3000],
  "postCreateCommand": "npm install",
  "remoteUser": "node"
}

🎬 Dev Container Walkthrough

Let's walk through what happens when you open a project with Dev Containers. Click each step to learn more.

1️⃣ VSCode Detects Configuration

When you open a folder with .devcontainer/, VSCode prompts: "Reopen in Container?" Click Yes.

2️⃣ Container Build & Start

VSCode pulls the base image, builds your container, and starts it. First time takes a few minutes; subsequent opens are nearly instant (cached layers!).

3️⃣ VSCode Server Installation

VSCode installs a small server inside the container. Your local VSCode UI connects to this server—you're actually editing files inside the container.

4️⃣ Extensions & Settings Applied

All extensions from devcontainer.json install automatically inside the container. Your team gets identical tooling!

5️⃣ Post-Create Commands Run

postCreateCommand runs (e.g., npm install). When VSCode finishes opening, dependencies are ready!

6️⃣ Develop Normally

Terminal, debugger, IntelliSense—everything works as if you were on a native machine. But you're in a container! Close VSCode, the container stops. Reopen, and you're back instantly.

🎊 The Result

Your entire team has byte-for-byte identical development environments. New developers are productive immediately. No more "works on my machine." Ever.

Sources: Docker containerization benefits (Docker, 2024), Docker layered architecture (Docker documentation), VSCode Dev Containers (Microsoft Visual Studio Code documentation)
🤔 Knowledge Check: What is the main advantage of using VSCode Dev Containers?
It eliminates the need for version control systems
It provides identical development environments for all team members
It makes VSCode run faster on older computers
It automatically deploys code to production servers

📌 Lesson Summary: Key Takeaways

You have completed the tutorial portion. Before the assessment, review the core concepts you should now be able to explain and apply.

What You Should Know Now

  • Environment parity: Docker packages app + dependencies so behavior is consistent across laptops, staging, and production.
  • Layered images: Efficient Dockerfiles place stable layers early and frequently changing code later to maximize cache reuse.
  • Networks & service discovery: Containers on the same Docker network can communicate by service/container name.
  • Persistent storage: Volumes keep important data safe beyond container lifecycle events.
  • Build once, run anywhere: The same image can run in multiple environments with predictable results.
  • Dev Containers: Team members can share identical development environments for faster onboarding and fewer setup issues.

✅ Ready for Validation

Next, you will complete a scored assessment to confirm mastery of deployment concepts, image design, runtime behavior, and development workflows.

📝 Assessment Starting

You are about to begin the final assessment. Answer each question before moving to the next one.

Assessment Rules

  • Total questions: 7
  • One attempt per question during a run
  • Passing score: 80% or higher
  • Use Next to begin Assessment Q1

Focus Areas

Expect questions on architecture layers, caching strategy, networking, persistence, and Dev Container workflow fundamentals.

📝 Assessment Question 1: In Docker's layered architecture, what component is shared across all containers running on the same host?
The base image filesystem
The host operating system kernel
The application dependencies layer
The container runtime writable layer
📝 Assessment Question 2: Which Dockerfile instruction should be placed earlier to maximize layer caching efficiency when only application code changes frequently?
COPY . . (copying all application code)
EXPOSE 3000 (port metadata declaration)
COPY package.json (copying dependency manifest)
CMD ["node", "server.js"] (startup command)
📝 Assessment Question 3: What problem does Docker networking solve for multi-container applications?
It automatically load-balances traffic across containers
It enables isolated containers to discover and communicate with each other
It encrypts all network traffic between containers by default
It increases the network bandwidth available to containers
📝 Assessment Question 4: Why is "build once, run anywhere" a significant advantage of Docker containers?
Docker images are smaller than traditional deployment packages
Containers can be deployed without any internet connectivity
The same image runs identically across different environments, eliminating environment-specific bugs
Docker images automatically update dependencies in production environments
📝 Assessment Question 5: In Docker Compose, what is the purpose of the "depends_on" directive?
It creates automatic network connections between specified services
It controls the startup order of services so dependencies start first
It defines which volumes should be shared between services
It specifies which Docker image versions to use for each service
📝 Assessment Question 6: What happens to data stored in a container's writable runtime layer when the container is deleted?
It is saved in the Docker image for future container instances
It is permanently lost unless the data is stored in a volume
It is automatically backed up to the host machine filesystem
It is transferred to other running containers on the same network
📝 Assessment Question 7: What configuration file does VSCode Dev Containers use to define the containerized development environment?
vscode-settings.json in the .vscode folder
docker-compose.yml in the project root
devcontainer.json in the .devcontainer folder
Dockerfile in the project root directory

🎉 Assessment Complete!

0%

Page 1 of 23